Overview
Now that you have created an EasyPost account and have added billing information, you're ready to add your carrier accounts. Lister currently supports USPS, FedEx, UPS, and Canada Post accounts. If your ideal carrier isn't listed, please submit a feature request.
Table of Contents
How to Add a Standard FedEx Account in EasyPost
How to Add a USPS Account in EasyPost
How to Add a Standard UPS Account in EasyPost
How to Add a Canada Post Account in EasyPost
How to Add Carrier Accounts
-
Login to your EasyPost account and click on "Account Settings" in the left navigation menu and click "Carriers"
-
Click "My Carrier Accounts"
-
Click the blue "Add Carrier" button at the top of the page

How to Add a Standard FedEx Account in EasyPost
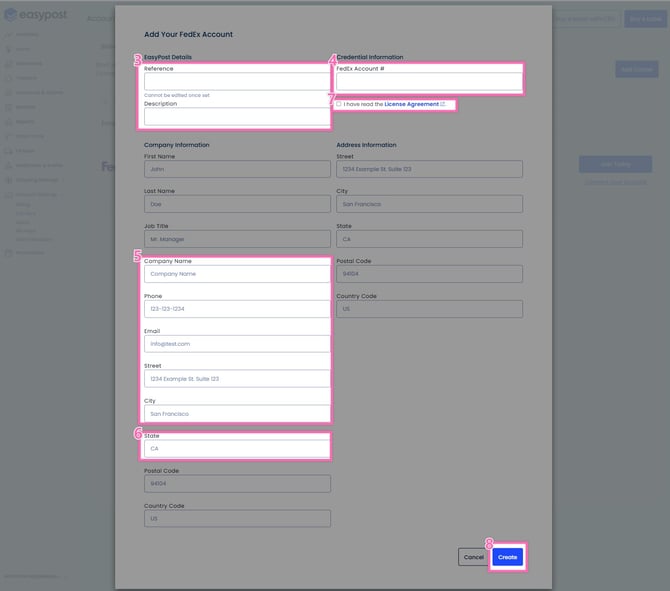
You can add a standard FedEx account (Ground, Home Delivery, etc.) to EasyPost by following these steps:
- Navigate to the carrier account section of EasyPost and click the "Add Carrier" button
- Type "FedEx" into the pop-up. Note: There will be a few results but click the one that just says "FedEx"

- Add a Reference and Description to recognize the account in EasyPost and Lister. We recommend setting both of these to your FedEx Account number
- Enter the FedEx account number exactly as it appears in your FedEx account
- Enter your Company Information and Address Information exactly as it appears in your FedEx account
-
Make sure you enter your address state as an abbreviation (i.e. CA instead of California). EasyPost will not accept state values that are spelled out
- Read and agree to the license agreement
- Click the "Create" button
Note: The fields for populating information have input limitations - this is true for all of the available fields, including "Company Name" (which has a length limit of 40 characters)
How to Add a FedEx SmartPost Account in EasyPost
If you have a FedEx SmartPost account, you can add it to EasyPost by following these steps:
- Navigate to the carrier account section of EasyPost and click the "Add Carrier" button
- Type "FedEx SmartPost" into the pop-up and click the FedEx SmartPost logo in the search results

- Add a Reference and Description to recognize the account in EasyPost and Lister. We recommend setting both of these to your FedEx Account number
- Enter the FedEx SmartPost account number and FedEx SmartPost Hub ID*
- Enter your Company Information and Address Information exactly as it appears in your FedEx SmartPost account
- Make sure you enter your address state as an abbreviation (i.e. CA instead of California). EasyPost will not accept state values that are spelled out
- Read and agree to the license agreement
- Click the "Create" button
*Note: When adding a FedEx SmartPost account, do NOT enter the preceding characters before the Hub ID number
-
Good: 1246
-
Bad: DEUL-1246
Note: The fields for populating information have input limitations - this is true for all of the available fields, including "Company Name" (which has a length limit of 40 characters).

Troubleshooting FedEx Issues in EasyPost
-
EasyPost's guides to adding FedEx accounts can be found below:
-
If you've added the account via your EasyPost Dashboard using your Account number, Company and Address Information, then you don't need to add your Meter number or Developer Key
-
If you do have developer credentials for FedEx already, you can provide those as well, but they are not required
-
Make sure the address and company information match what you have in your FedEx account
-
Make sure you enter your address state as an abbreviation (i.e. DC instead of District of Columbia). EasyPost will not accept state values that are spelled out
-
Make sure you don't leave any field blank (even if it does not indicate it is required)
-
After submitting that form, if you'd like to add your meter number or developer key, click the "Edit" button on your FedEx Account
How to Add a USPS Account in EasyPost
By default, each EasyPost account automatically comes with a USPS account that gets Commercial Plus Pricing rates.
⚠️Important: DO NOT DELETE THE AUTOMATIC USPS ACCOUNT. EASYPOST USES THIS ACCOUNT TO PREVENT FLAGGING SYSTEMS FOR ANTI-FRAUD BEHAVIOR.
If you do not want to ship via USPS, you can prevent your employees from purchasing USPS labels with the "disabled rates" admin setting in Lister.
How to add a Goodwill-USPS Negotiated Service Agreement (NSA)
If you currently ship with a USPS account linked to the Goodwill-USPS Negotiated Service Agreement, please email support@easypost.com with the following message to connect this to EasyPost:
Hi EasyPost team!
Can you add <Your Company Name> to the Goodwill Negotiated Service Agreement for <Your USPS Carrier Account ID>?
The contact of the agreement is <Contact Name for Your Company>.
Thank you,
How to find your USPS Carrier Account ID
-
Navigate to the carrier account section of EasyPost
-
Copy the "Account ID" in the USPS box

How to Add a Standard UPS Account in EasyPost
You can add a standard account (Ground, Next Day, etc.) to EasyPost by following these steps:
- Navigate to the carrier account section of EasyPost and click the "Add Carrier" button
- Type "UPS" into the pop-up. Note: There will be a few results but click the one that just says "UPS"

- Enter your UPS account information by following the steps in this guide from EasyPost
- Add a Reference and Description to recognize the account in EasyPost and Lister. We recommend setting both of these to your UPS Account number
- Click the blue "Save and Connect" button

How to Add a Canada Post Account in EasyPost
Canadian sellers can add a CanadaPost account to EasyPost by following these steps
- Navigate to the carrier account section of EasyPost and click the "Add Carrier" button
- Type "Canada Post" in the search box and click the Canada Post icon

- EasyPost will redirect you to the Canada Post website to continue the integration
- Enter your CanadaPost account username and password
-
Click "Sign In" to automatically link your credentials to EasyPost.

General Troubleshooting Steps
If you're unable to submit the form, double-check the following:
-
You aren't exceeding 40 characters when filling in fields like Company Name
-
The address, contact details, and company information match what you have on file with your carrier account
-
You enter your address state as an abbreviation (i.e., DC instead of District of Columbia) EasyPost will not accept state values that are spelled out
-
No field is left blank - this includes the EasyPost "description" field