Overview
This guide outlines how to interpret media tickets and properly store media items in inventory, along with instructions for storing, picking, and purging items using Lister and Link.
Overview Media Tickets
Each listed media item will have a printed ticket stored with the item to streamline locating it in the warehouse. Media tickets should be placed within a book so that the barcode and large Shelf Identifier are easily visible when looking at a shelf of books within inventory: 
Each media ticket includes the following information:
- Shelf Identifier: A randomly generated unique code used to identify the item during picking and purging.
- Barcode with the UID: The unique identifier for the individual item.
- Title: The beginning of the title.
- Supplier: The name of the supplier associated with the item.
- SKU (same as UID): The unique identifier for the item.
- ASIN: Amazon Standard Identification Number (if applicable).
- Created By: The user who created the listing.
- Date Added: The date the item was added to inventory.

Adding Media Items to Inventory
Storing Media Items in Link
Reshelf in Link with Ring Barcode Scanner (Recommended)
- Open the Link app and tap Reshelf from the home screen
- Scan all media tickets being moved to an inventory location.
- Scan the shelf barcode to assign items to their respective shelves.

Reshelf in Link with Camera
- Open the Link app and tap Reshelf from the home screen.
- Tap the blue scan icon to open the camera app.
- Line up the media ticket barcode with the camera.
- Once recognized, Scanned will appear at the top, and the SKU will display at the bottom.
- Repeat for all items being moved to the inventory location.
- Line up the inventory location barcode in the camera app.
- Once scanned, products will be moved to the designated inventory location.

Optional Workflow: Quick Reshelf via Lister (Not Recommended)
While it’s possible to update inventory using Lister as a backup, this method is not ideal for inventory areas with limited space or where scanning images and item details are needed. Quick Reshelf in Lister does not show images or the current product status.
- Navigate to the Products page.
- Click More actions then select Quick Reshelf.
- Scan the media tickets into the pop-up window.
- Scan the inventory location barcode or manually select it from the dropdown list.
- Click the blue Reshelf button to assign products to the location.
- Place the products in the physical inventory location, ensuring the media tickets and shelf identifier codes face the same direction.

Picking Books Order Items
Recommended Workflow: Picking in Link
For full details on picking orders in Link, please review our help guide here.
- Log in to Link, then tap Pick Orders from the home screen
- Select your Media picking profile to only pick media orders
- (Optional) Enter how many items you will pick
- Tap Start picking
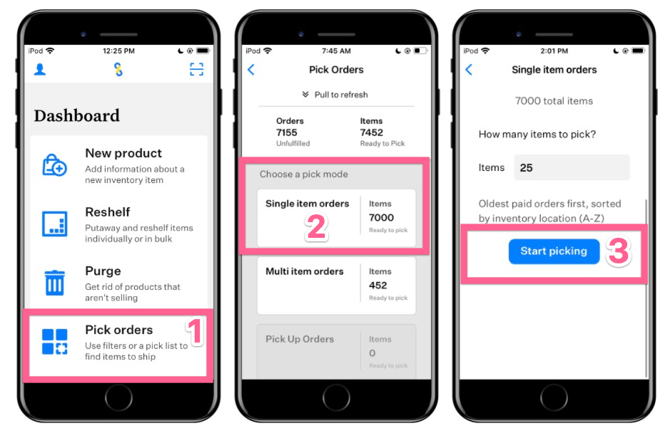
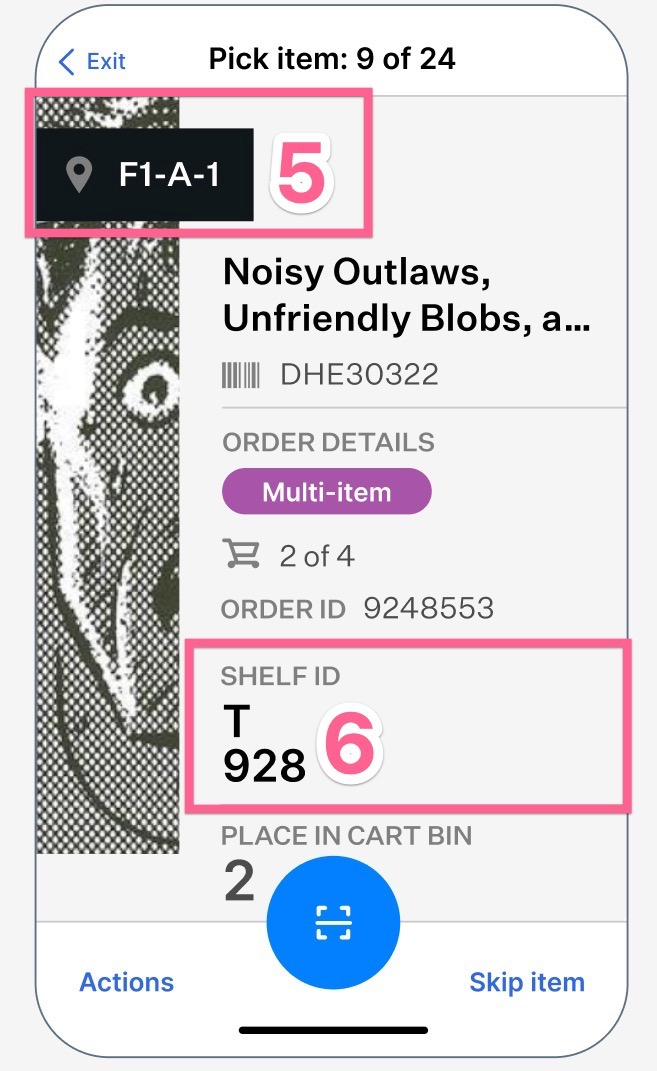
- The first item to pick will be displayed on the screen
- Navigate to the inventory location shown on the screen
- Locate the “Shelf Identifier” code on the shelf that matches the location on the screen

- Look at the inventory shelf and find the item with the matching shelf identifier code
- Scan the barcode on the printed slip to confirm you’ve picked the correct item
- Repeat until all items are picked
Optional Workflow: Printed Pick Lists
For full details on printing Pick Lists from Lister, please review our help guide here.
- Navigate to the Orders page in Lister
- Click More Actions
- Select Create Pick Lists in the dropdown menu
- Select your Media picking profile to only pick media orders
- Optional: Change how many items you will pick
- Click Print to send the pick list to a standard office printer
Optional Workflow: Printed Pack Slips (Not Recommended)
This method prints one sheet of paper per order. For full details on printing Pack Slips from Lister, please review our help guide here.
- Navigate to the Orders page
- Select the orders you'd like to print packslips for
- Click Actions
- Select Print packslips
- Select an option from the Sort by dropdown menu
- Click Print packslips