Overview
This guide walks you through downloading the correct STAR TSP 700 series printer drivers to support printing receipt labels in Lister, as well as common troubleshooting steps to resolve label printing issues.
Step 1: Install Drivers
Mac
MacOS Drivers and installation instructions are found here. Follow these instructions carefully to ensure your printer is correctly configured.
Windows
Windows drivers and installation instructions for the TSP 700 and TSP 700II are found here. Follow the instructions carefully to ensure the printer is correctly configured.
Step 2: Install Lister Connect
If you’ve not already installed Lister Connect on the computer that will be printing labels, click the link below for installation instructions for Windows or Mac. Each computer with a connected label printer or digital scale will need to have this software installed:
Follow these troubleshooting steps if you run into any issues during the installation process.
Step 3: Launch Lister Connect and Select the Printer
Lister will auto-connect to your printer as long as Lister Connect is running on your computer. If Lister Connect is not running, Lister will not be able to print.
If the printer is not connected, ensure Lister Connect is running, then click “Reconnect”

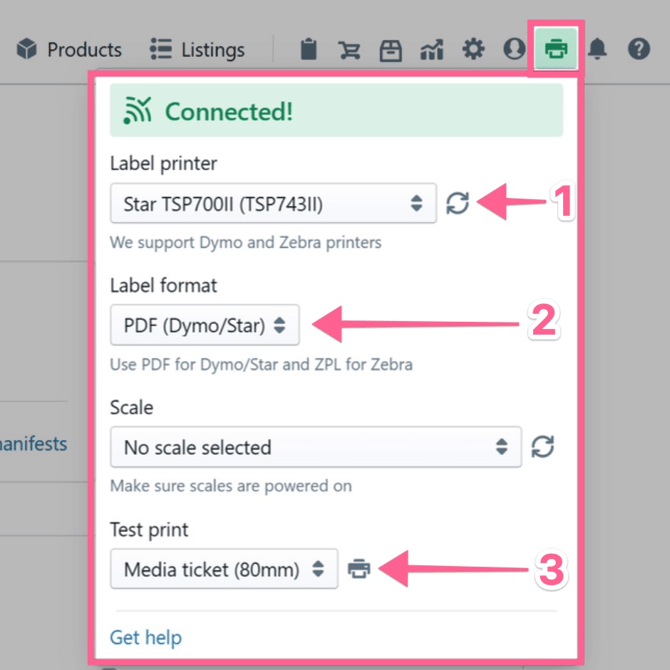
From there follow these steps to set up your printer in Lister:
- Select your receipt printer in the dropdown menu under Label printer
- Select PDF (Dymo/Star) in the dropdown menu under Label format
- Select Media ticket (80mm) under the Test print menu, then click the printer icon to print a test label
Troubleshooting
Follow the steps in the guides below for the most common troubleshooting issues.
If you’re unable to print legible labels, verify that the printer is in Starline mode by printing a self-test label:
- Ensure the printer’s power is OFF.
- Press and hold the FEED button.
- Power printer ON, only releasing the FEED button when printing begins.
- Remove Self-Test page(s) after printing complete
- The printed label should say "Emulation : Star Line/T"
If the label says “Emulation: ESC/POS" or similar, you will need to change it to StarLine by following the steps here.
More troubleshooting info can be found in the guides below:
- Troubleshooting Lister Connect Errors on Windows
- Troubleshooting Lister Connect Errors on Mac
- Troubleshooting “Installation Failed” Messages