Overview
Setting up an effective inventory system is a key component of an efficient e-commerce business. Additionally, having products assigned to the correct inventory location is crucial for quick order fulfillment. A digital inventory system is the first step in optimizing your workflow.
This article outlines how to set up inventory locations in Lister and the best practices for editing and deleting inventory locations.
Table of Contents
How to Access Inventory Locations Settings in Lister
Best Practices for Inventory Location Names
Inventory Location Guide for Shopgoodwill Sellers
Inventory Location Guide for Non-Shopgoodwill Sellers
How to Print Inventory Location Barcodes
How to Access Inventory Locations Settings in Lister
Inventory Locations settings are in the admin section of Lister. Only admins and custom roles with access to manage inventory locations can view and edit these settings.
-
Click the gear icon in the top right corner of Lister to navigate to the admin settings page
-
Click “Inventory Locations” in the left navigation menu under the “Inventory, Shipping and Printing” header

Best Practices for Inventory Location Names
- Limit Inventory location names to 27 characters or less so that barcode readers can easily scan them
- Review our blog post How to Design a Warehouse Layout for Secondhand Inventory Fulfillment for more ideas on optimizing your inventory locations
Inventory Location Guide for Shopgoodwill Sellers
Not a Shopgoodwill seller? Click here to skip to standard inventory settings!
Inventory locations for Shopgoodwill sellers are controlled directly in Shopgoodwill. This prevents missing data in the Shopgoodwill seller portal.
Import existing locations from Shopgoodwill, or create new locations in Lister that automatically sync to your Shopgoodwill seller account.
How to Import Inventory Locations From Shopgoodwill
Before importing locations, we recommend verifying all locations you want to be imported are active in Shopgoodwill
-
Log into the Shopgoodwill seller portal and navigate to Manage Seller Settings
-
Click “Storage Locations” to add, edit, or deactivate locations as needed
-
In Lister, click the gear icon in the top-right navigation menu to go to the admin settings pages
-
Click "Inventory Locations" in the left column
-
Click the Import button in the top right of the page
-
Select “From Shopgoodwill” in the dropdown menu

How to Upload Locations via CSV and Sync to Shopgoodwill
-
Download and fill out this CSV template and save it to your desktop
-
In Lister, navigate to Admin>Inventory Locations
-
Click the “Import” button on the top right of the page
-
Upload the CSV to the import box
-
Click the blue “Import” button
How to Add Individual Inventory Locations and Sync to Shopgoodwill
-
Click the blue “Add inventory location” button on the Inventory Locations Settings page
-
Add the new location name
-
Click the blue “Create inventory location” button to create the new location and sync it to Shopgoodwill automatically
How to Edit or Delete Inventory Locations for Shopgoodwill Sellers
Warning: Deleting an inventory location will drop the location from all products assigned to the location and cannot be undone.
Before deleting a location, ensure no active listings are assigned to the location to prevent missing items when picking orders.
Note: If you change the name of a storage location, be sure to reprint the location label after making your edits and apply it to the physical location in your inventory. The old barcode will not work after the name has been changed.
-
Log into the Shopgoodwill Seller Portal and navigate to “Manage Seller Settings”
-
Click “Storage Locations” in the top menu
-
Click the pencil icon in the actions menu next to the location you wish to edit or deactivate
-
Edit the name of the location or change the status as needed
-
Click the blue “Save” button
-
In Lister, navigate to Admin>Inventory Locations
-
Click the Import button in the top right of the screen and select “From Shopgoodwill” in the dropdown menu
Inventory Location Guide for Non-Shopgoodwill Sellers
Selling on Shopgoodwill? Follow the steps above to create and control your inventory locations via Shopgoodwill!
Lister has two methods for adding inventory locations: Bulk import via a CSV file or by manually adding individual locations. Each method is described below.
How to Create and Import Locations via CSV
-
Download and fill out this CSV template and save it to your desktop
-
In Lister, navigate to Admin>Inventory Locations
-
Click the “Import” button on the top right of the page
-
Upload the CSV to the import box
-
Click the blue “Import” button
How to Add Individual Locations
-
Click the blue “Add inventory location” button on the Inventory Locations Settings page
-
Add the location name in the new window
-
Click the blue “Create inventory location” button
How to Edit Inventory Locations
Note: If you change the name of a location, be sure to reprint the label after making your edits and apply it to the physical location in your inventory. The old barcode will not work after the name has been changed.
-
Click “Edit” next to the inventory location name to be changed
-
Edit the location name
-
Click “Update inventory location” to rename the inventory location
How to Delete Inventory Locations
Warning: Deleting an inventory location will drop the location from all products assigned to the location and cannot be undone.
Before deleting a location, ensure no active listings are assigned to the location to prevent missing items when picking orders.
Inventory locations can be deleted individually or in bulk, as described below.
How to Delete Individual Locations
-
Click “Edit” next to the inventory location to be deleted
-
Click “Delete inventory location” to remove the location from Lister
How to Bulk Delete Multiple Locations
-
Click the checkboxes next to each location to be deleted
-
Click the “Actions” menu at the top of the locations list
-
Select “Bulk Delete” from the dropdown menu
How to Print Inventory Location Barcodes
Inventory location barcodes should be printed and applied to all inventory locations so they can be scanned as part of your putaway process. Inventory barcode labels are printed via Lister Connect on standard barcode labels.
Note: If you change the name of a location, be sure to reprint the label after making your edits and apply it to the physical location in your inventory. The old barcode will not work after the name has been changed.
Method 1: Print All Inventory Barcodes
💡Operational Tip: The “Print all locations” option is handy when first setting up your Lister account!
-
Ensure Lister Connect is running by confirming the printer icon in the top right corner of Lister is green. Make sure that product barcode labels are loaded into the printer
-
Click the “Print all barcodes” button in the top right of the inventory locations page to print one of each inventory location
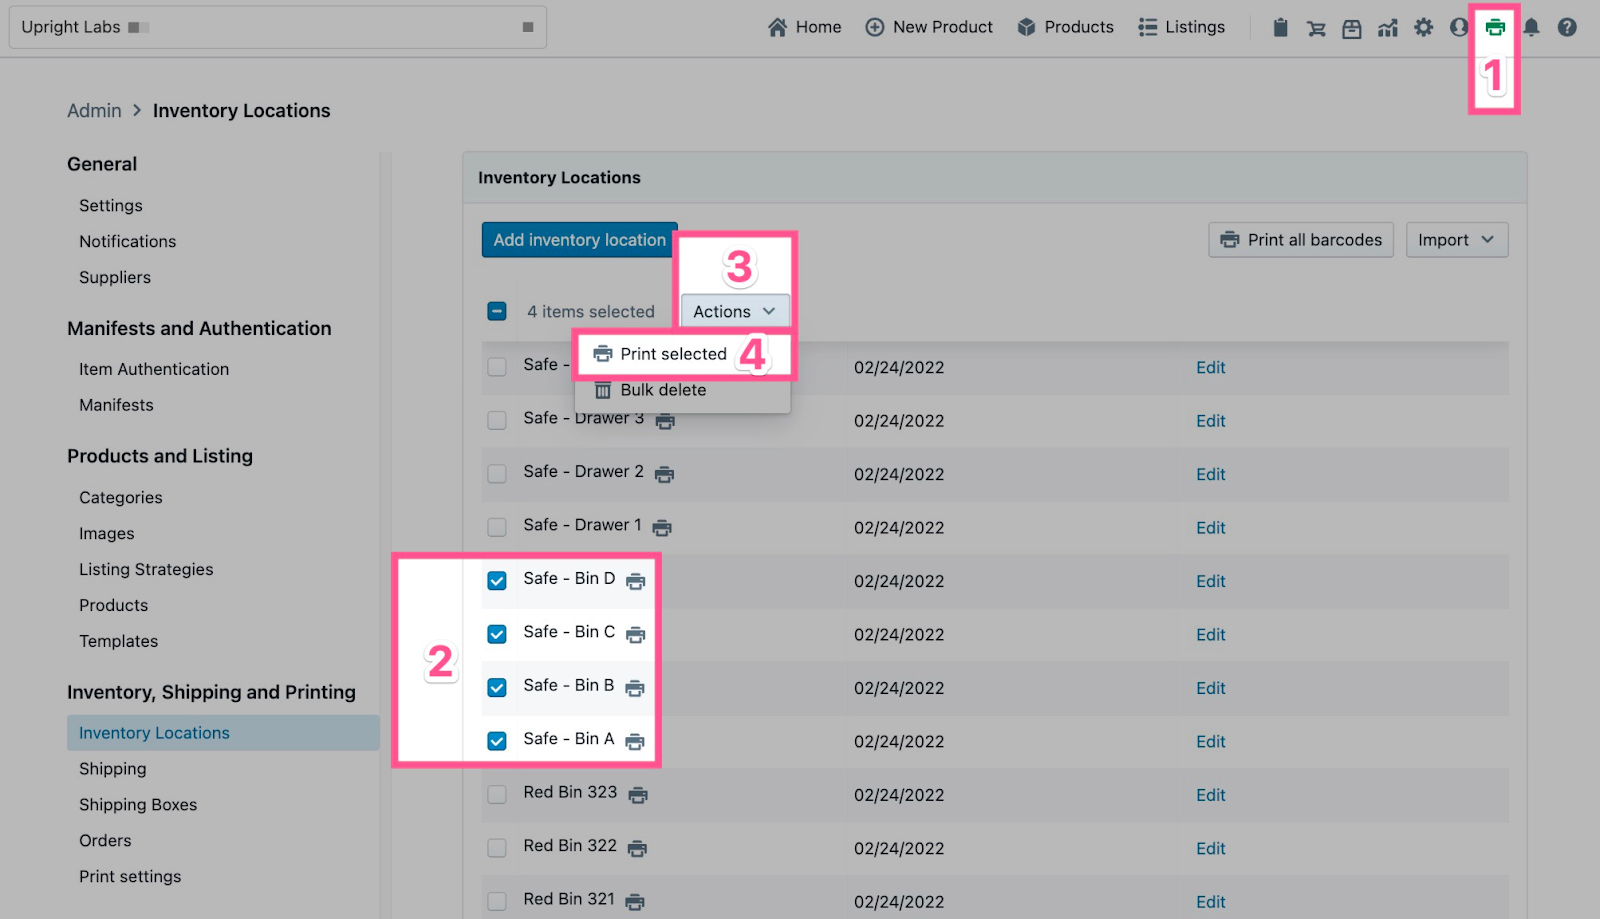
Method 2: Print Selected Barcodes
-
Ensure Lister Connect is running by confirming the printer icon in the top right corner of Lister is green. Make sure that product barcode labels are loaded into the printer
-
Click the checkboxes next to each location you want to print
-
Click the “Actions” menu and select “Print selected”
💡Operational Tip: To quickly select a group of locations, hold the shift key and click the first checkbox in the group. While still holding the shift key, select the last checkbox in the group. All locations between the two will be selected automatically!
Method 3: Print Individual Barcodes
-
Ensure Lister Connect is running by confirming the printer icon in the top right corner of Lister is green. Make sure that product barcode labels are loaded into the printer
-
Click the printer icon next to the location you want to print